Sunday 31 October 2010

Loopy flowers

Here's a step by step way of making the flower brooch I showed in my last post as requested:

What you'll need:
A square of felt
Scissors
Needle and thread to match
Brooch back
Pins

Step 1:
Cut strips of felt about 1cm thick, or as desired but be aware the thicker the strips the thicker the 'petals', I use nine strips for each flower.
Unlike me, use large scissors so that your lines are a bit straighter, but I don't mind wobbly petals.

Step 2:
Loop all of the strips four times and pin to secure


Step 3:
Stitch each pinned piece to keep the loops from slipping and then stitch all of the groups of petals together to make your flower shape.  Try grouping them together before stitching to get an idea of what works where as it needs to be a general roundish shape to look most flower-like.

Step 4:
Once all the loops have been stitched together, cut a circle of felt big enough to cover all of the raw edges and to make a flat base to stitch the brooch pin to
I've used a different colour here for it to show up better on the photo but it's probably best to use the same colour felt so it all blends in.

Step 5:
Attach your brooch pin and if you're lucky enough to have read this post and have received your order, you can also attach your labels too!


Step 6:
Stand back and admire your handiwork.  All you need to do now is find something gorgeous you want to accessorize your new flower with and await lovely compliments!

Making a start

So I've got the first of the mini quilts top done...


I've got some basting spray I'm keen on trying out, but I dont have a table or even floor space big and flat enough!  Does anyone have any advice to give me on the best way to do it?

Saturday 30 October 2010

Hello from Scotland!

Hi Everyone!  My name's Debi and I blog over at My Happy Sewing Place.  I LOVE sewing outfits from vintage patterns, especially from the years 1939-1941 (and a few other decades as well).  Here's some of the photos of what I have been getting up to:

 I'm really excited about this blog as I'll be very busy with work in the lead up to the holidays so I can use a bit of a support group to get things movin' :-)

I'll be working on a Raggedy Ann doll for my niece from the 1940 McCall 820 pattern:

I can't wait to get started!!

Friday 29 October 2010

Lavender ladies tutorial

Wow, look at all these great handmade gifts already! I thought I would share with you a simple, quick gift to make.


These sweet little lavender ladies are a modern take on the old fashioned lavender bags that go into your underwear drawer or under your pillow. They make perfect gifts for friends, teachers, colleagues or ‘secret santa’ (Kris Kringle) gifts.

To make a lavender lady, you will need:
Fabric of your choice (approx 2 x 20cm square)
Felt to make the face
Embroidery thread
Needle for embroidery
Sewing machine or needle and thread
Pins
Dried lavender (you will find it in craft shops or health food shops)
Stuffing


To begin, fold your fabric over with the wrong side showing. You don’t need a pattern, just draw two overlapping circles straight onto the fabric (use chalk or pencil though, I used a marker so that you could see it in the photo). For my lavender lady the big circle’s diameter is 12cm and the smaller circle’s diameter is 8cm. It doesn’t need to be perfect though! Cut out your little lady and put aside.


Next, cut out a little round face from the felt. Again, just draw the circle straight onto the felt and cut it out. Mine is 4.5cm in diameter. Stitch on some little eyes and a mouth using embroidery thread. If you are making a few lavender ladies, try stitching different expressions on them.


Stitch the face straight onto the head of the body.


Now, lie the two body pieces right sides together and pin them securely. See those two pins at the bottom? They are very important! This is the gap you are going to leave so that you can stuff the body. Stitch the two body pieces together using a sewing machine or hand sewing. Don’t stitch across the gap.


Turn your lavender lady inside out. Looking cute, isn’t she? Start to stuff your lavender lady, alternating between stuffing and spoonfuls of lavender. All up, I put about 5 tablespoons of lavender in mine.


Once she is all stuffed, hand sew the opening at the bottom together.


And there you have it – a very sweet little lavender lady. I tied a little ribbon around her neck to make her look a bit more festive.

A Colourful Christmas

(Clockwise from top: Spice Cubes, Turquoise Holiday Trees, Tiny Dot in Petal, Turquoise Jingle Jangle, Orange Little Flakes from Michael Miller's Christmas Spice collection. Tiny Dots from Patty Young's Andalucia collection.)

I know, Hallowe'en isn't even over and yet I'm planning my Christmas decorating! What can I say? Christmas is my favourite holiday of the year and any excuse to start early is just fine with me.

Pink, orange, and turquoise may seem like an unusual holiday theme, but it works perfectly for me. I am planning on making new pillow covers for the living room, a skirt for our tree, and a table runner for our dining room. For the front porch and the dining room table, I'm making glitter pomegranates and oranges, as well as a glitter sign for our front door.

I'd really like to try my hand at these snow globes and this beautiful glitter house by Red Heads Craft More Fun:

(Image from Red Heads Craft More Fun. Tutorial here.)

My dilemma: Martha Stewart or Cathie Filian glitter? Which do you prefer? Input on your favourite glitter is welcomed! :)

La Inglesita on her 15 bags mission

Hi everyone, I'm Maria and I love designing and sewing clothes for my children that I blog here. This year I planned to give handmade gifts to my girlfriends so this blog is just what I need. As a good fabric addict does, I have accumulated yards of beautiful fabrics over the year. Now it's the perfect moment to get them out of my stash and use them. I'm going to make 15 (yes, fifteen, 1 and 5 ) of the Charlie bag, following this tutorial by verypurpleperson
I will start in a couple of weeks so if any of you has made it I'll be very glad to receive advice.
Thank you in advance for all your ideas and happy making!

Thursday 28 October 2010

White Chocolate Caramel Pears (or Apples)

I had the idea to use pears (instead of the traditional apples) after seeing white chocolate covered pears on Martha Stewart. Meant to be Halloween ghosts, they were cute, but the chocolate cracked right off when you cut them up to eat. I figured the caramel would help hold things together, so I tried it. Amazing flavor, and you won't find them anywhere else.

Plus, pears seem very Christmas-like. Partridge in a Pear Tree and all that.

You want a pear that's not quite ripe, otherwise the stick just comes right back out, and you won't have anything to hold on to while you dip it. The boiling water and warm caramel starts them ripening, so by the time you eat them, they're just right.

The big secret to caramel dipping success is simple: dip the fruit in boiling water for about 10 seconds. This removes any waxes or other residue, and the caramel is guaranteed to stick.
I can't recall where I ran across this valuable nugget of information, but it wasn't on Martha.

So, here it is, my personal recipe/directions for making your own gourmet caramel pears/apples.

4 D'Anjou pears, or 4 Granny Smith apples
 4 sticks (usually included in bag of caramels)
small saucepan of boiling water
1 14 oz bag of Kraft caramels (about 50) or 11 oz bag of caramel bits
1 Tbl water
microwave-safe bowl
Waxed paper
Butter for waxed paper
cookie sheet
2 Tbl sugar
2 tsp cinnamon
12 oz bag Nestle Premier white chocolate chips
2 Tbl shortening

Prepare fruit by washing thoroughly and inserting stick. Then dip in boiling water for about 10 seconds, and allow to dry. This removes all residues and waxes from the fruit, which allows the caramel to stick. (this will also discolor the fruit a little, so make sure the top part that will not be covered in caramel is not dipped in the water, to maintain a nice appearance)

Butter your waxed paper and set on a cookie sheet (in case you need to move it) or on your counter.

Unwrap all the caramels and put in a microwave safe bowl. Add 1 Tbl water. Microwave on high for 1 ½ to 2 minutes. Caramels will not all look melted;
stir to complete melting.
You can microwave for 30 seconds more if needed, but it’s important not to overcook. If the caramel seems really stiff, you can add a little more water, but not too much, or it will be too runny to stick to the pears.

Tilt the bowl, and dip and swirl fruit in melted caramel until evenly coated, then set on buttered waxed paper to cool.
It should take at least ½ hour to set up enough to dip in chocolate. (You can set up faster if you place your cookie sheet on top of ice or other frozen stuff. I have a serving platter with an insert you freeze to help keep the platter cold on a buffet, and I use that under my cookie sheet when I'm in a hurry.) You'll know it's set up enough when you can touch it without it sticking to your fingers.

(if you have more caramel, but no more fruit ready, scoop up caramel with a pretzel, and press another pretzel on top of that. dip in chocolate later, or not. yum.)

Mix together 2 Tbl sugar and 2 tsp cinnamon in a shallow bowl and set aside.

Place white chocolate chips and 2 Tbl shortening in microwave-safe bowl. Microwave on high 1 ½ min. Not all the chips will look melted;
stir to complete melting (use a metal spoon - you don't want any extra moisture in this mixture).

Tilt bowl, and dip and swirl carameled fruit in chocolate until evenly coated.
Hold over bowl and swirl to allow excess to drip off. You can also run the edge of the spoon across the bottom of the fruit to help scrape off excess.

Dip and roll in cinnamon sugar mixture, and/or hold fruit over bowl and spoon/shake cinnamon sugar onto fruit. This is a little messy (and difficult to photograph by yourself - both hands are busy), because the chocolate will still be dripping a little, but you have to do it before the chocolate sets up, or the cinnamon sugar won’t stick. I discovered that if I put some in the bowl, to set the fruit on, and some in a shaker, to sprinkle over, it's a little less mess. You'll have some cinnamon sugar coated white chocolate drips in the bowl - but that's okay, because they're a tasty treat once they set up.

Set back on waxed paper and allow chocolate to harden before serving.

These will keep for only a few days. I don't recommend refrigerating them, just put in a covered container. If you refrigerate, they tend to get too chewy, plus, the juices will run, making it a bit soupy. I generally make them the night before an event, or, if I have time, first thing that morning.

Granny Smith apples have a tart flavor that I think goes nice with the sweetness of the white chocolate. Fuji are sweeter, and seem to go better with milk or dark chocolate. You can use any kind of apples, as long as they are crisp and fresh.
Substitute regular or dark chocolate chips for a different look and flavor, drizzle more melted chocolate over the first coating, or double or triple dip the fruit in different layers of chocolate. Use crushed cookies, chopped nuts, crushed candy bars, or sprinkles instead of cinnamon sugar.

If you already have a home-made caramel recipe you like, you can use that instead of melting commercial caramels. I just do it this way because it's reliable and easy.

Note to those not in the US: not sure what kind of caramels you guys have available. For this recipe, you want a soft chewy caramel.

Edit: should have said - coming to you from House Full of Monkeys

Drawstring Purse - Detailing Needed

I've finished my first Christmas project - almost. It's a drawstring purse, a very simple design made from a Burda tutorial (it was on their old English site, before they merged with Burdastyle.I'm pretty happy with the outcome, how the purse looks and I'm pleased with how the handles came out, they are pretty sturdy for being so thin, it comes from the fact that the fabric is folded four times. I'm not happy with the ribbon I bought for the drawstring, I think it overtakes too much. They are at the moment quite long and will be shorter either way, but I'm not sure I would like them anyway, they shine too much.

So I'm left with a few questions (ah, it's a great thing I joined this blog). Should I use black ribbon or perhaps a burgundy to better match the flowers in the purse? Should I try and make some out of the fabric? However the fabric is a china satin and frays a lot and gets very thick if layered, which was what worked great for the handles. It's not something I need to focus on right now, but I need to figure this out before Christmas at least.

I'm also thinking about adding a detail. The original pattern had a flower, I'm thinking either that or a bow, a flat bow made out of the fabric. It's true what they say, the last 5% of a creation - the details - is what matters most.

I will make another purse out of the same pattern (it's simple and if anyone's interested I can share the basics). It will probably be quick since I've already made one. Well, quick until I get to the same point as this one and need to worry about the details.

Hello crafty people!

Hello one and all. My name is Lauren and I am a craft addict. I am sadly lacking in women, children and craft loving men to make for this year, but I am planning to make a lot of my decorations myself. I've just bought the materials needed for my door wreath and some tree decorations, I'm planning a small cross stitch sampler for the kitchen, and I think I might make a lovely fairy for our tree too - all of which I'll be happy to share with you lovely people.

Gift wise, I'm planning to make a patchwork topper for my Nan to keep her legs warm when she's sitting down. I've not done any patchworking before, so it'll be a bit of an experiment but it's going to be small so I'm not too scared! I'm also planning some padded hangers for by Brother in Law's girlfriend, and still need to think of something for my Mother in Law, but I'm a bit lacking in ideas so far...

My main source of inspiration so far is Martha Stewart's Encyclopaedia of Crafts (I'm very tempted by her new encyclopaedia of fabric crafts) and her whole website...
I've also just ordered several crafting books through the library. I always buy these books and then find I only want to make 1 thing in them, so this year I'm going to try before I buy!

I'm also attending a class to make a patchwork table runner for Christmas, and a 'Homemade Christmas' day which I'll try to get photos of. Very excited about all the lovely things I've seen so far on here and can't wait to contribute myself!

My blog

Wednesday 27 October 2010

Another Newcomer

Hello everyone!
My name is Helena and I blog at Crafting My Style. I love to sew and bake which are my main two crafts. This year has been a slow year for me, the first half of it I was pregnant with some usual side effects (I could barely sit by the end of my pregnancy) and then trying to find myself in my new mom role. Now, at 4½ months, my son has found some sleeping routines which gives me time for some crafting.

This is the first year that I will really go for crafted gifts, so I hope they are appreciated. My two cousins will each get a purse and my niece will get a stuffed animal. This is my starting out point, if I finish these items, I may add more later.

Happy Holiday Crafting everyone, and I look forward to inspiration here!

A Christmas Crafter

Posies Tea Cosy (image via Ravelry)

Hello! My name is Sarah and I blog over at Rhinestones and Telephones. I love handmade and every year I try to make or bake as many gifts as possible. My family loves my homemade peppermint bark and this year I'm going to give Ina Garten's French Chocolate Bark a whirl, just to shake things up a bit.

I've recently started to crochet again and I'm really enjoying it. I've made a hat for myself and I'm going to give the tea cosy above a try. I was thinking of making up gift baskets for my family with the tea cosy, a new tea pot, a selection of teas, and my handmade barks and cookies.

Reading everyone's posts on here is very inspiring and I'm looking forward to seeing more of your creations. Thank you to Tilly for having me on board!

Too busy reading blogs to get started!

Hi, I'm Sarah from narcoleptic in a cupboard  I've only just started blogging, but I've been avidly following other peoples blogs for long enough... 
I've got one lap quilt started, and a few more in planning...  I'll hopefully be making a few bags too.  Also I need some more ideas so I'm really enjoying seeing what everyone else is up to!

Hi There and Chickens

Hi! I'm Huff, and I blog at Huff Makes Stuff. I sew and knit and dabble in a handful of other crafty pursuits. Most of the gifts I'll be making this year are for the children in our families. Every year there seem to be more and more of them! I'm full of ideas for the littlies this year but am still searching for ideas and patterns for some of the older kids.

I have found loads of toy pattern books from the 70s and 80s in op shops/thrift stores like this one:
Once you get past the the strangeness, and interesting fabric choices (it can take a bit of imagination) there are usually several cute patterns. Like this family of chickens. They only took two fat quarters of fabric and some felt scraps to make and will be perfect for my niece who is three.Looking forward to seeing what you're all up to and sharing ideas!

Tutorial: Easy Teddy

As promised! This is the easiest teddy I've ever made. I should perhaps mention I've only ever made two types of teddy, but this was definitely the easiest. You don't even need a sewing machine - as long as you can sew a running stitch you can make this teddy.


YOU WILL NEED:
Some fabric, twice the size of the teddy you intend to make
A length of ribbon
Needle and cotton
Pencil
Card and an existing teddy to use as a template (or just freestyle one)
Toy stuffing
Fabric paints/ pens

1. Put something on the telly to entertain you whilst sewing. Pride & Prejudice is my film of choice because, despite loving it, I have no TV boyfriends in it to distract me


2. Ensure your workspace doesn't look like mine


3. Create your template. You can either draw around a teddy you already own, in which case make sure it's a flat, unarticulated teddy like the one pictured below ...


... or create your own template. I'm using one from Sew Pretty Christmas Homestyle by Tone Finnanger. I highly recommend her books, they're filled with fabulous projects.


When creating your template remember not to draw in ears, ideally they should be a seperate template to ensure they stand up correctly but, honestly, anything goes. As long as you can sew it you'll be fine.

You'll notice on my template I've marked where to leave a hole for each ear and a hole to allow me to reverse and then stuff the teddy. You'll need to mark these on your template too. The ear holes will, naturally, be the same width as the ear and the side hole just needs to be big enough to allow you to turn the finished teddy in the right way and also allow you to get your fingers inside to position the stuffing.

4. Fold your fabric in half and place your template in the middle. The entire template will need to be sewn around, no using the fold in any way (sorry!). Draw around your template and remember to draw around your ear template twice.


Comme ca!


5. I've found that when sewing together the bottom piece of fabric tends to move about so pin your two pieces together just to be on the safe side.


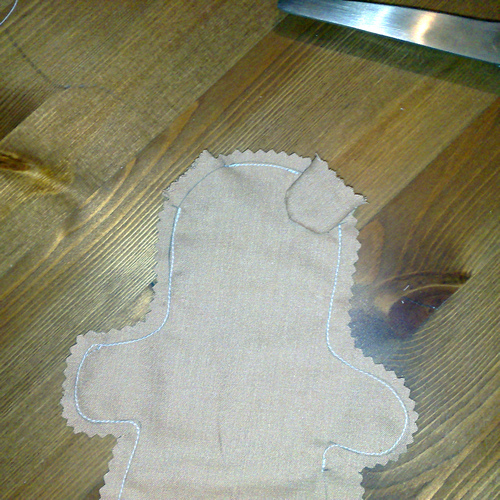
6. Running stitch your way around each template using the line you drew as your guideline. A very handy tip I picked up from Tone Finnanger, sew on the line! (sorry about the over exposure here)


7. Once it's all stitched (apart from your gaps!) cut out your template with a seam allowance added. Don't forget to clip the curves. I tend to veer into a fatter seam allowance around the area for the side hole as that will need to be invisibly stitched closed and I've discovered it's easier with more fabric. The choice is yours though.


8. Turn the ears the right way in and insert into the hole you left on the head upside down (trust me). Once you've positioned them to your satisfaction sew the hole closed. In the picture below the left ear is in place and the right ear demonstrates how the ear should be positioned. You just need to insert it between the fabric inside the hole, not lay it on the top like the right ear.


9. Turn your teddy in the right way ...


10. ... and stuff! (my favourite part!)


11. Slip stitch your side hole closed. Youtube has some excellent tutorials on this stitch if you're not familiar with it but essentially you're still doing a running stitch but each complete stitch is on opposite sides of the fabric. Remember to stitch on the folded-in fabric so you can't see the cotton and when it comes to knotting the fabric poke the knot in so it's hidden.


12. Grab your ribbon and tie, tightly, around the neck to define the head.


13. Draw on your face, add any other painted features you please, ensure they're wash proof and you're done!